Part 1 - The API
This a beginner friendly tutorial in Asp .NET 5 using the C# programming language where I build a simple REST API with asp .net core
Getting Started
Needed Software :
For this tutorial you will need to install the following software in your device:
Needed VS Code Extensions :
Now that you've installed the required software, you will need to install couple more vs code extensions to make our life easier, open vs code click on File >Open Folder > Select the folder where you want the app files to be
then click on the extension icon on the left menu and then do the following:
In the search bar type SQLite, Select the one as in the picture and press the install button
Now repeat the same process and install these extensions
- C# Extensions ( install the one that says "Project No longer Under Development")
- C#
- NuGet Package Manager
- Material Icon Theme
Needed NuGet Packages :
Now that we've got our extensions installed, for windows/Linux users press on Ctrl + Shift + P and Command + Shift + P for mac users, and you will see the following :
Type EntityFramework and press Enter, you should see the following :
Click on Microsoft.EntityFrameworkCore and then Select the version matching your .NET version(in our case it is 5.0.0) :
Now repeat the Same Process and install the following :
- Microsoft.EntityFrameworkCore.Sqlite
- Microsoft.EntityFrameworkCore.Design
Now on the top Menu press on Terminal > New Terminal, on the bottom something like this should appear
and then paste the following command and hit enter
dotnet tool install --global dotnet-ef
Creating The Project :
1. Creating The Solution
Now in the terminal, type the following command
and then we should see in our folder explorer a new generated folder called API that looks similar to the following :
2. Our first Controller
Now that we've created our project, it's time to start coding something, the first step to do here is to create a C# class, to do that right click on the Controllers folder, click on New C# Class and this is what we should get :
now we do the typical controller boilerplate and the final result should be like that :
for the sake of simplicity I wont dive deep into this and explain everything, all you need to know is the attribute [ApiController] means that this is an Api controller, and the [Route()] holds in its parameter the link we must hit to target this controller , just copy everything I did and keep in mind that in every Asp .NET Web API project you will need to do the same. Now we will create a method that will be executed every time we send a Get request to our server, a GET request is basically that we're asking the server to provide us some data and if we send the right request we will get what we asked for, the return type of this method should be an ActionResult and for test purposes we will return a message saying controller is working, the code should look like this
obviously the [HttpGet] refers to the type of request we need to send to our server and the Ok is one of the many return types that an ActionResult has and holds in its parameter the data our server will send back to the client, in this example here we will just return a message saying "controller is working". Our first controller is written what it is left now is just to test it, but first we will need to run our server, open the terminal and execute these 2 following commans
cd api
now head out to the postman extension in Google Chrome, and fill out the spaces as the following :
in the first rectangle is our route, which is https://localhost:5001/tasks and in the second rectangle is our request type which is in our case a GET request, click send and we will see in the bottom the message that we hardcoded into our app, which speaks for it self, our controller is working
3. Creating the model
Since this is a to-do list app, we wont return normal strings to the user, in fact we will return tasks, that's why we need to create a task object that we will return to the user, and to make the architecture cleaner we will do that in a folder called models, so the first step now is to create a folder named Models inside our solution, to do that, right click the API folder, Create New Folder and call it Models, you will get something like this :
now right click that folder > Create New C# Class and fill it with these proprities
Hint : type prop and then press tab to get the following syntax :
public int MyProperty { get; set; }
4. Creating the Database
the next step is to create another folder called Data inside our API folder and to do that right click the API folder > New Folder and name it Data, now Right click the Data folder > New C# Class and name it TasksDbContext and your folder explorer should look like this :
now we need to add the following boilerplate which will tell our app that this class is a Db Context that holds a list of Task, so fill in as the following :
public class TasksDbContext : DbContext
{
public TasksDbContext(DbContextOptions<TasksDbContext> options)
: base(options)
{
}
public DbSet<Task> Tasks {get; set;}
}
Adding Sqlite to our App
now that we have a Db Context, We need the actual database, to do that we need to first tell our app that we'r using a Sqlite database which is the easiest to deal with, to do that first go to appsettings.Development.json and add the following
"ConnectionStrings": {
"Default": "Data Source=ToDo.db"
}
to make the file look like this
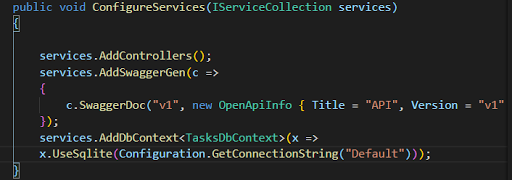
and then go to startup.cs and in the Configure services add
services.AddDbContext<TasksDbContext>(x =>
x.UseSqlite(Configuration.GetConnectionString("Default")));
to make our method look like this :
now that everything is setup all we need is to execute the following commands :dotnet ef migrations add Initial -o .\API\Data\
and
dotnet ef database update
and then we should see some modification in our app files, including the creation of additional C# classes and the appearance of an empty database file called ToDo.db and we also should remove the weatherforecast.cs and weatherforecastController.cs which is something we should've done earlier because we wont be using these. after completing all the steps, your folder explorer should like this :
5. Modifying the Controller
Our next move now is to actually access the Database, get data from it and modify it, to do that we need to first add these lines to our controller
private TasksDbContext _context;
public TasksController(TasksDbContext context)
{
_context = context;
}
What that will do is create an instance (copy) of our database in order to access its proprieties, after adding those lines the final results will look like this :
Creating the GET Action
What we should do now is modify the GetTasks method to make it like an actual .NET Web API action, so we will modify it to the following :
[HttpGet]
public async System.Threading.Tasks.
Task<ActionResult<IReadOnlyList<Task>>> GetTasks(){
var data = await _context.Tasks.ToListAsync();
return Ok(data);
}
Now let's break what we did into small steps to make you understand, we modified the method to be asynchronous and because we did that the return type should be Task<T> and because we named our model "Task" we will run into some errors that's why we need to add the System.Threading.Tasks.Task reference in line, and you might notice instead of returning a simple ActionResult we are now returning an ActionResult<IReadOnlyList<Task>> and that means that the API response will hold data inside it and that data is of type IReadOnlyList<Task>, which means a List of Task objects, and inside the method we have written this line
var data = await _context.Tasks.ToListAsync();
The await means that an asynchronous method has been called and we need to await it which is in our case ToListAsync(); as for the list of the code is that we're getting the Tasks dbset from the _context which is our Database Context and then we're turning it into a list and returning it to the user and because we don't have any data yet we can't test this method because it will just return an empty array, so as you've guessed we will now add another action that is responsible for adding elements to our database.
Creating the POST Action
In the world of APIs this type of request is called a POST request, and it is responsible for adding data to our database, in Asp .NET and in our project the syntax of this of this action is the following :
[HttpPost]
public async System.Threading.Tasks.
Task<ActionResult> CreateTask(Task task){
if(!ModelState.IsValid){
return BadRequest(
"Model not matching requirements");
}
await _context.Tasks.AddAsync(task);
await _context.SaveChangesAsync();
return Ok("Successfully Created a Task");
}
The [HttpPost] attribute indicates that this action is hit when a POST request is sent, as we dive into this action we notice that this method requires a Task in its parameter, this Task object will be passed to the body of our request as a JSON object and .NET will convert to a C# object, then we could see that there's an if statements, what that means is that if not(ModelState.IsValid) then return bad request and the ModelState.IsValid is a Boolean that has the value of true when the JSON object parameter match the C# object parameter, which means that our JSON must have a Content property and if not then we return a message informing the user of the issue and not break our app. However, if our model is what its supposed to be then we will add the task object to the Tasks Db set through the method
await _context.Tasks.AddAsync(task);
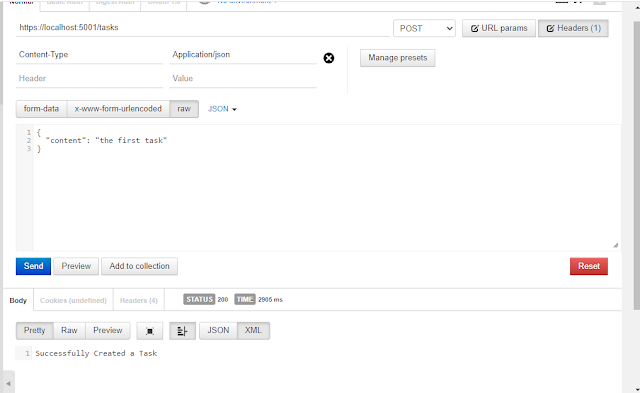
and then save those changes to the database through the following method and return a message to the user informing him that the task has been created, Now lets head out to Postman and test both the post and get request,
as you can see in the screenshot above, we have our Postman interface, we have written the url to our API "https://localhost:5001/tasks" and we have set the request type to be a post request, an additional step is that we need to add a header
Content-Type with the value
Application/json . What that will do is tell our API that our body is json formatted, now we need to specify the body which is a Json object that should look like the following :
{
"content": "the first task"
}
Now hit the send button and you should see the "Succesfully Created a task " message, which means that our request has been fulfilled, to see it in action, we will need to send a GET request to our server so let's do that
as you could see in the request above we actually added that Task object into our database, and a todo list is about adding tasks and removing them when finished, but now we can only add tasks, so let's code the deleting part.
Creating the DELETE Action
a delete action syntax in ASP .NET is the following :
[HttpDelete("{id}")]
public async System.Threading.Tasks.
Task<ActionResult> DeleteTask(int id){
var taskToDelete = await _context.Tasks
.SingleOrDefaultAsync(x => x.Id == id);
if(taskToDelete == null)
return BadRequest("Task Not Found");
_context.Remove(taskToDelete);
await _context.SaveChangesAsync();
return Ok("Successfully Deleted Task");
}
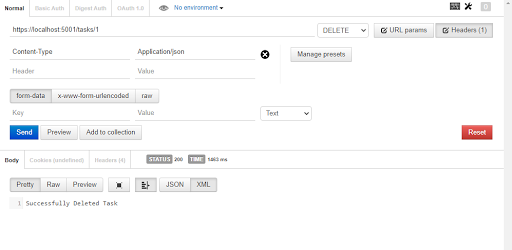
This time our attribute is a bit different, it has a parameter now, and that parameter is the route, and you can see the route here is {id} that means that whatever we write next to our base URL, will be converted into the next method's parameter that is called id and in our case it's the only parameter there are, then that parameter will be used to look for the task that has the same id as we passed and then delete and then save the changes to the database, and if there's no task with such id we will simply return a message informing the user. what is left now is to test this action
as we see here we modified the URL and added /1 which is the id of our first task, and we also changed the request type to DELETE, as we click on send we receive a message saying that the task is deleted, now we need to send another get request to check if the task is deleted or no, and voila
our response is now an empty array which is what we're supposed to get, and with that we finished our simple API.
HOMEWORK
Now that you've learned the basics of API, you will need to do your researches and figure out a way to modify existing tasks, to help you out I will give you some hints and an example to start,
Hints
Hint 1 : the Request type of this method is called PUT
Hint 2 : the method will receive 2 paramaters (int id, Task task)
Hint 3 : you must look for the desired item through the id and linq syntax and then modify it
Example :
public async Task<ActionResult> UpdateClient(string id,
ClientDTO client){
if(!ModelState.IsValid){
return BadRequest(
"Client Data not matching Database requirements");
}
client.Id = id;
_context.Entry(client).State = EntityState.Modified;
Client clientFromDb = await _context.Users.
FirstOrDefaultAsync(c => c.Id == id);
if(clientFromDb != null){
await _context.Update(clientFromDb);
await _context.SaveChangesAsync();
return Ok("Client Updated");
}
return NotFound("Client Not Found");
}
And to help you out more you can visit this link
After you finish doing the exercise, visit
My GitHub Repo and compare my code to yours
Final Words :
Creating this detailed tutorial drained a lot of my energy as I try to keep its quality as high as possible, and your engagement will motivate me to go even further, if you made it this far, comment down below what you think of this, and if you run into any issues contact me through my socials or my contact form. And if you want to support me Consider buying something from my store
Have a nice day